File Digitization Service

Digitizing for embroidery enable you to enhance the aesthetic appeal of your apparel. It is an art that is mostly preferred by people related to the fashion industry. With this, you can easily stand apart from others by having your own identity. This practice has been in use for the ages and it is still having a dominant position in the fashion industry. But remember that you need a specific digitized file to get your design on the apparel or on the desired product. This is the point where file digitization service by the professions is needed to complete the work.
If you are searching to get the embroidery digitization services, then you should get in touch with a professional team of Absolute Digitizing. The professionals will provide your best file digitization service so that you get the best design on your products. Connect with them and they will provide you best quality services within an affordable price range.
Bring Out Your Creativity
Forget about using the old designs, you are having the freedom to use new designs and bring your own creativeness out. All thanks to digitizing! It is interesting to know that with technological advancement in other industries, the custom digitizing has also improved. Similarly, the file digitization service has also become better because of the latest software. Professionals use them to create the file compatible with the machine for further processing.
We suggest to bring out your imagination out during the digitization process. Play with colors and use the right picture for the best design. With this, you can cater to the needs of valuable customers according to their own requirements. Now, you don’t have to place the stitches on your apparel through your hands. You can upload your design in the form of a digitized file into the machine to do the stitches. Nowadays, machines are accurate and efficient in term of working and will help you to save a lot of time and efforts.
In addition to this, if you are planning to go for mass production, then machines are the only option used by professional companies to complete their orders on time. But remember that a digitized file is a key to get all this work done. Moving on, if you are not a brand and doing the embroidery on a smaller scale, then you still need a digitized file, machine, and the product on which you want to get the design.

Digitizing Files for Embroidery
You can use any picture after converting it into the digital format for your embroidery project. The picture can be of any type. Keep one thing in your mind that to get outstanding results you need the best quality file for the work. For this, you need to ensure that you should connect with a professional company to avail the file digitization service.
The process of digitizing is not easy. To complete the task, you need proper skills to use the embroidery digitizing software, fabric knowledge, and other things to do the job. In the majority of the cases, the person wishes to get the design on various fabrics. Keep one thing clear in your mind that you should not use the same file for the left chest and jacket back. The issue here is the difference between the sizes according to your products.
When you are starting the work of digitizing for embroidery, then your first step should be the selection of pictures. You should make the selection according to your skill level. Furthermore, if you are having complex images, then you need assistance from the expert digitizers. But if you are planning to save your time, then you should go for single objects.
You need to consider the following things during the process:
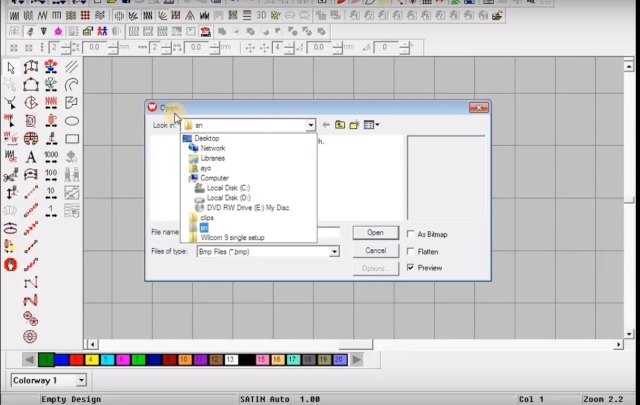
Import of Picture
To start the process, you have to open the image using the digitizing software. Some of the digitizing software that you can choose for the work include Hatch by Wilcom, Embrid, and much more. You can pick the software according to your own choice but remember that every software is capable to digitize files. If you are not able to do it on your own, then you should avail the file digitization service from the experienced company.
For instance, if you are using Wilcom Software, then follow the below steps:
- On the top menu bar, you have to click on the image tab.
- From the drop-down menu click on the Insert File.
- From the pop-up window, you have to select the path where you want to save the picture.
- Now, select the image and click OK to import.
The aforementioned steps will help you to import the selected image into the software. Now, you are ready to start work. Moreover, if you are going to use the software for the first time, then you have to adjust the setting. For your information, in the new versions, you get the option to drag and drop the tools.
Stitch Type and Length Adjustments
For flawless stitching results, setting plays an important role. If you have not set the stitch properties, then it’s time to do it. You need to start the work by outlining and making them into column stitches. Using the embroidery digitizing software, you have the option to select multiple objects at the same time. You can increase or decrease the size of items to get the perfect fit.
When you are doing so you need to ensure that you don’t forget about the underlay. The column stitches do not appear different from the underlay. For large designs, you need to enlarge the column stitches but ensure that they are not large enough to break. Remember that instead of making stitches long, then you have to go with fill stitches. You have to manage the extra pulling of fabric with the stable fills.
Underlay Settings Management
If you are going to digitize pictures for embroidery from scratch, then no underlay settings are applied. But if you are working on an already digitized file, then the underlay stitches will exist. When you are going to edit the pre-digitized file, then additional stitches for underlay will be essential to manage the full compensation. It is better to adjust the underlay settings from the beginning to avoid problems. For your information, you have to use 1/3 stitches in total for each layer developing the perfect adjustments for every available layer. For instance, if you are having 21000 stitches, then one layer will have 9000 stitches.
Looking to connect with professionals to fix issues in your digitized file, then you should get in touch with a professional company to avail the file digitization service.
Adjustment of Texture in Pictures
When you are working with large designs, every minute detail is visible. For maintaining the consistency and good look, work on surrounding elements as well. You will get easy fill up option with texture embossed fill in the background. The human eye can only see the top layer but the second and third layer is hidden. This provides firmness to the design and you will have the option to be creative with colors during the sew-out process. With layering your stitches, you can easily manage the distortion and this will strengthen your stitches as well. You should use these step as a standard procedure in future digitising pictures for embroidery. Furthermore, if you are having a problem in getting the files, then you should contact an experienced company to get the file digitization service.
Hope now you are aware of the embroidery digitising process and the things that you need to keep in your mind to get the digitized file. If you are looking to get the file digitization service, then you should contact Absolute Digitizing for the satisfactory results. The professional team will look into your requirement and you will have no regret on your decision. A wide range of services is available with an affordable price tag.
Contact Us To Request A Free Quote!
The post File Digitization Service appeared first on Absolute Digitizing.
from Absolute Digitizing https://ift.tt/2GzkNGP
via IFTTT
Comments
Post a Comment